Developer Guide

- Introduction
- Acknowledgements
- Setting up, getting started
- Design
- Implementation
- Documentation, logging, testing, configuration, dev-ops
- Appendix A: Requirements
- Appendix B: Instructions for manual testing
Introduction
Welcome to the Developer Guide for Tuthub, a Command Line Interface (CLI) App that will help you find your next batch of teaching assistants (TA) in no time! Tuthub is a desktop app for NUS professors who wish to track and choose their next batch of teaching assistants/tutors based on their past performance and records but have little time to spare for tedious administrative work.
Acknowledgements
We’d like to thank:
- SE-Edu’s AddressBook-Level3 for being the foundation of this brownfield project.
Setting up, getting started
Refer to the guide Setting up and getting started.
Design
.puml files used to create diagrams in this document can be found in the diagrams folder. Refer to the PlantUML Tutorial at se-edu/guides to learn how to create and edit diagrams.
Architecture
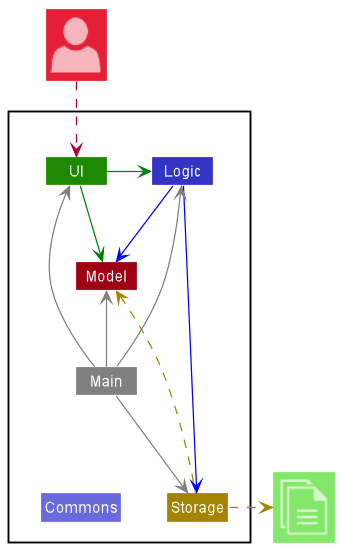
The Architecture Diagram given above explains the high-level design of the App.
Given below is a quick overview of main components and how they interact with each other.
Main components of the architecture
Main has two classes called Main and MainApp. It is responsible for,
- At app launch: Initializes the components in the correct sequence, and connects them up with each other.
- At shut down: Shuts down the components and invokes cleanup methods where necessary.
Commons represents a collection of classes used by multiple other components.
The rest of the App consists of four components.
-
UI: The UI of the App. -
Logic: The command executor. -
Model: Holds the data of the App in memory. -
Storage: Reads data from, and writes data to, the hard disk.
How the architecture components interact with each other
The Sequence Diagram below shows how the components interact with each other for the scenario where the user issues the command delete 1.
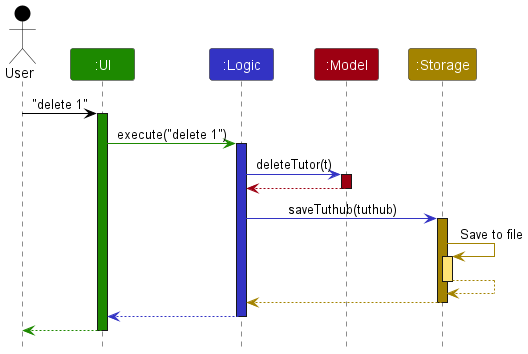
Each of the four main components (also shown in the diagram above),
- defines its API in an
interfacewith the same name as the Component. - implements its functionality using a concrete
{Component Name}Managerclass (which follows the corresponding APIinterfacementioned in the previous point).
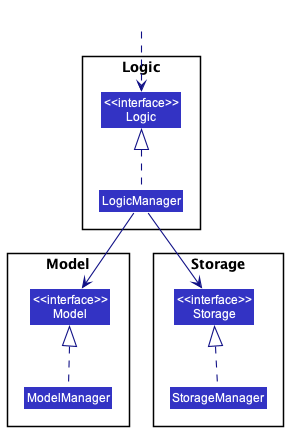
For example, the Logic component defines its API in the Logic.java interface and implements its functionality using the LogicManager.java class which follows the Logic interface. Other components interact with a given component through its interface rather than the concrete class (reason: to prevent outside component’s being coupled to the implementation of a component), as illustrated in the (partial) class diagram below.
The sections below give more details of each component.
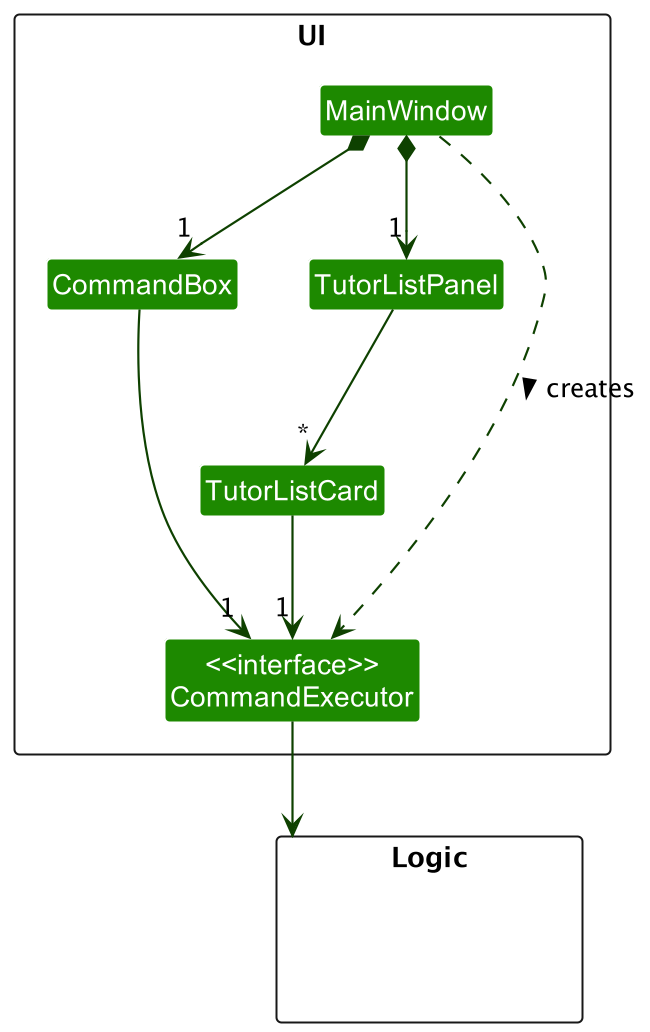
UI component
The API of this component is specified in Ui.java
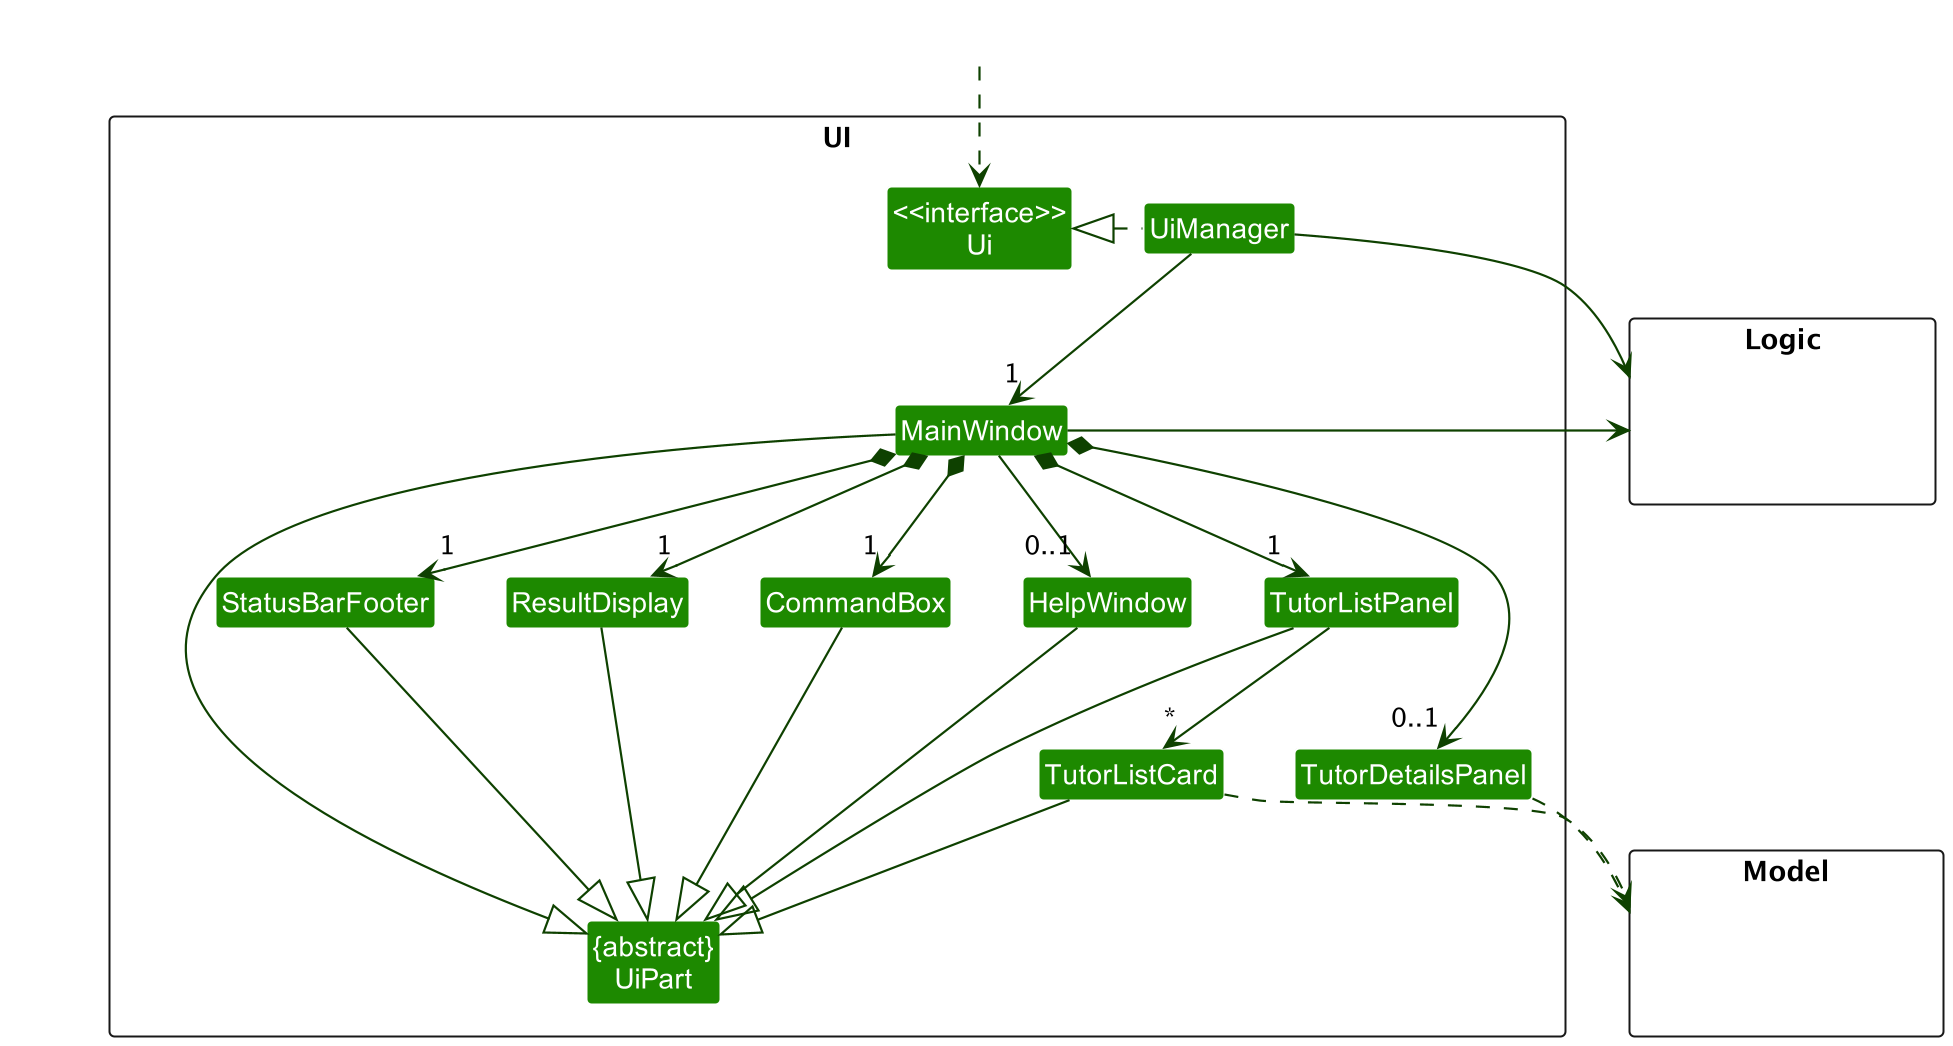
The UI consists of a MainWindow that is made up of parts e.g.CommandBox, ResultDisplay, TutorListPanel, StatusBarFooter etc. All these, including the MainWindow, inherit from the abstract UiPart class which captures the commonalities between classes that represent parts of the visible GUI.
The UI component uses the JavaFx UI framework. The layout of these UI parts are defined in matching .fxml files that are in the src/main/resources/view folder. For example, the layout of the MainWindow is specified in MainWindow.fxml
The UI component,
- executes user commands using the
Logiccomponent. - listens for changes to
Modeldata so that the UI can be updated with the modified data. - keeps a reference to the
Logiccomponent, because theUIrelies on theLogicto execute commands. - depends on some classes in the
Modelcomponent, as it displaysTutorobject residing in theModel.
In addition to the third point above, the CommmandExecutor functional interface, initially encapsulated inside the CommandBox class, was abstracted out to allow multiple UI components to communicate with the Logic component. MainWindow creates a CommandExecutor, which is then passed down to CommandBox and TutorListCard to communicate with Logic in order to execute a command.
Logic component
API : Logic.java
Here’s a (partial) class diagram of the Logic component:
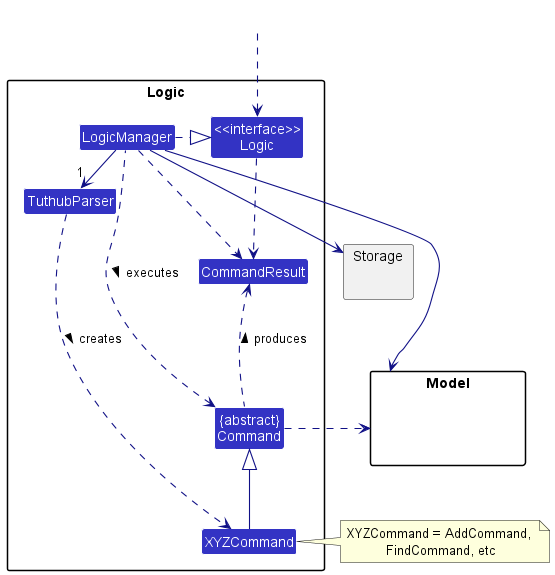
How the Logic component works:
- When
Logicis called upon to execute a command, it uses theTuthubParserclass to parse the user command. - This results in a
Commandobject (more precisely, an object of one of its subclasses e.g.,AddCommand) which is executed by theLogicManager. - The command can communicate with the
Modelwhen it is executed (e.g. to add a tutor). - The result of the command execution is encapsulated as a
CommandResultobject which is returned fromLogic.
The Sequence Diagram below illustrates the interactions within the Logic component for the execute("delete 1") API call.
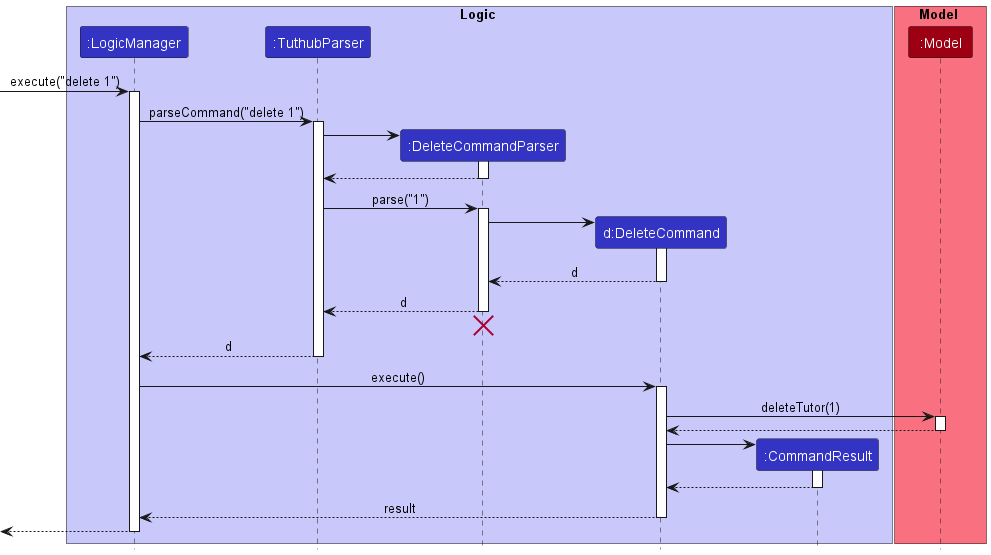
DeleteCommandParser should end at the destroy marker (X) but due to a limitation of PlantUML, the lifeline reaches the end of diagram.
Here are the other classes in Logic (omitted from the class diagram above) that are used for parsing a user command:
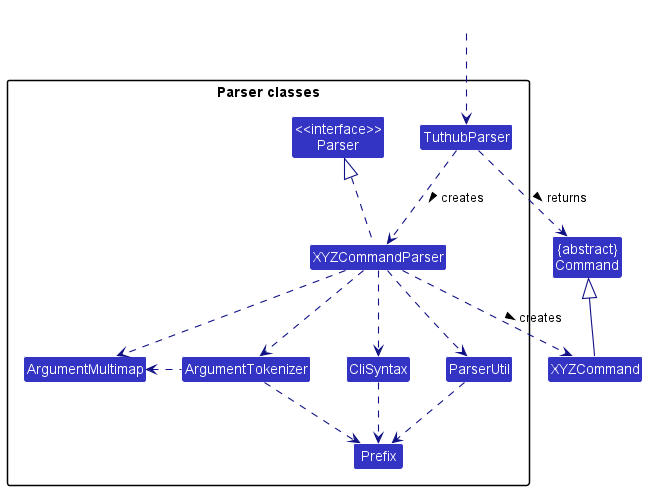
How the parsing works:
- When called upon to parse a user command, the
TuthubParserclass creates anXYZCommandParser(XYZis a placeholder for the specific command name e.g.,AddCommandParser) which uses the other classes shown above to parse the user command and create aXYZCommandobject (e.g.,AddCommand) which theTuthubParserreturns back as aCommandobject. - All
XYZCommandParserclasses (e.g.,AddCommandParser,DeleteCommandParser, …) inherit from theParserinterface so that they can be treated similarly where possible e.g, during testing.
Model component
API : Model.java
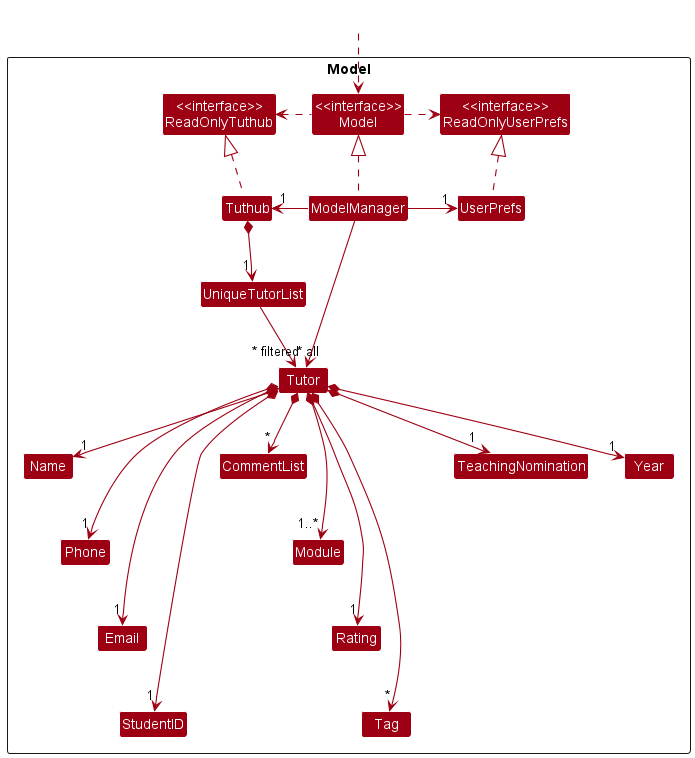
The Model component,
- stores tuthub data i.e., all
Tutorobjects (which are contained in aUniqueTutorListobject). - stores the currently ‘selected’
Tutorobjects (e.g., results of a search query) as a separate filtered list which is exposed to outsiders as an unmodifiableObservableList<Tutor>that can be ‘observed’ e.g. the UI can be bound to this list so that the UI automatically updates when the data in the list change. - stores a
UserPrefobject that represents the user’s preferences. This is exposed to the outside as aReadOnlyUserPrefobjects. - does not depend on any of the other three components (as the
Modelrepresents data entities of the domain, they should make sense on their own without depending on other components)
Tag list in the Tuthub, which Tutor references. This allows Tuthub to only require one Tag object per unique tag, instead of each Tutor needing their own Tag objects.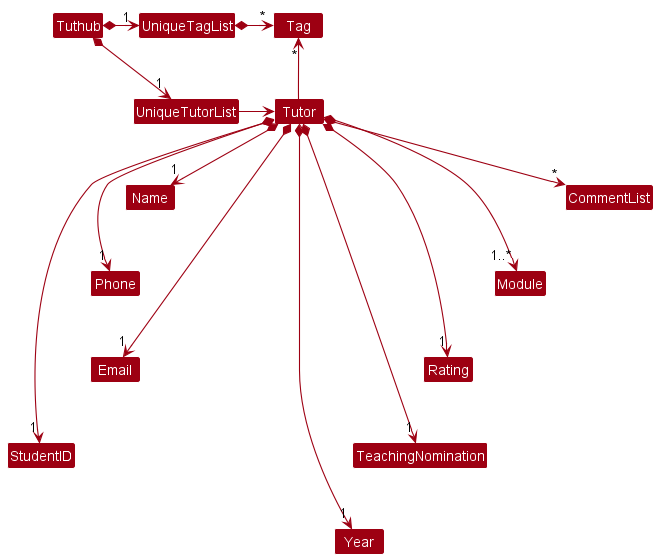
Storage component
API : Storage.java
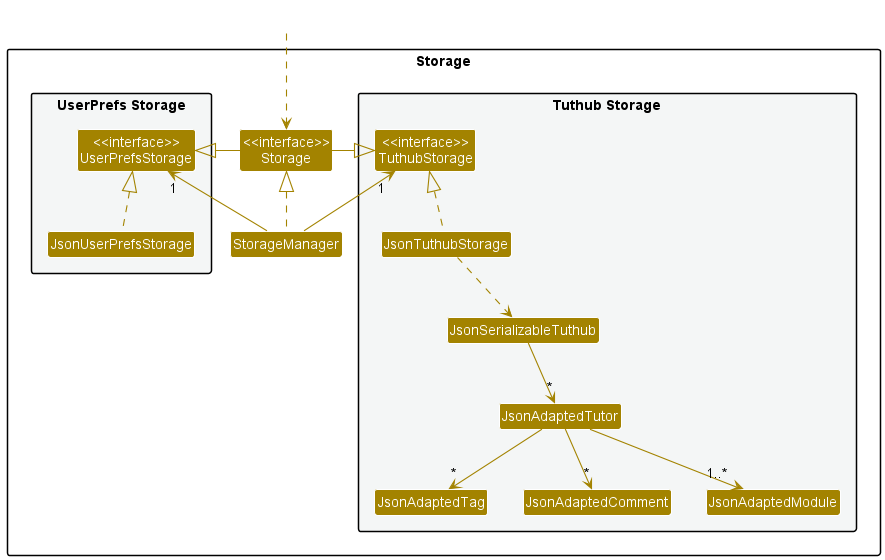
The Storage component,
- can save both tuthub data and user preference data in json format, and read them back into corresponding objects.
- inherits from both
TuthubStorageandUserPrefStorage, which means it can be treated as either one (if only the functionality of only one is needed). - depends on some classes in the
Modelcomponent (because theStoragecomponent’s job is to save/retrieve objects that belong to theModel)
Common classes
Classes used by multiple components are in the tuthub.commons package.
Implementation
This section describes some noteworthy details on how certain features are implemented.
Add Feature
Tutor information is stored as Tutor objects, which captures all the information that the tutor represents. When the user adds a tutor, the program creates a new Tutor object with the given information and adds it to the ObservableList to be displayed in the program. The Model class handles the checking of uniqueness while the Storage class handles the conversion of the Tutor object to a JSON format and updating of the storage file in {source_root}/data/Tuthub.json.
Implementation
The following methods in Tuthub manage the addition of tutors:
-
Tuthub#AddCommand(Tutor tutor)- Adds the provided tutor to the list of tutors created -
Tuthub#AddCommandParser(String args)- Parses theaddcommand and determines the attributes of theTutorobject created based on the given prefixes
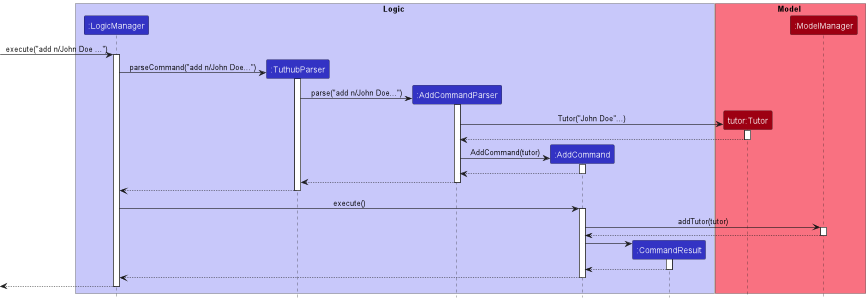
Given below are the different steps taken when the user adds tutors.
Step 1: The user enters the command word add, followed by the prefixes and information that they want to store. Example: add n/John Doe p/98765432 e/e0782693 m/CS2100 y/3 s/A0123496X tn/1 r/5.0 t/senior.
Step 2: The program makes use of TuthubParser to make sense of the keyword and determine which parser to use to parse the arguments. In this case, the AddCommandParser is used.
Step 3: The AddCommandParser makes sense of the arguments through the use of the prefixes, with the help of ParserUtil, and creates an AddCommand object with the provided information in the form of a Tutor object.
Step 4: The AddCommand object is executed. The Tutor object created in step 3 is added to the list of tutors captured in the ModelManager class, which then utilises the UI class to display the created Tutor object.
Step 5: The execution ends and returns a CommandResult object contained the success message to be displayed to the GUI to the user.
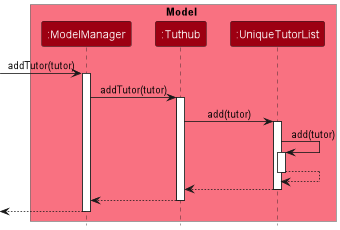
The following sequence diagram demonstrates the above operations:
Extra information on how ModelManager handles adding of tutors:
The ModelManager class calls on the addTutor method of Tuthub, which calls on the add method of the UniqueTutorList currently present in Tuthub. UniqueTutorList enforces the checking of uniqueness before the tutor is added and displayed in the observableList.
The following sequence diagram demonstrates the above operations:
Design considerations:
Aspect: Implementation of add
-
Alternative 1: Add the tutor to a list that is maintained by the
Modelclass (chosen)- Pros: Tutor can be viewed in the GUI once added without requiring any additional reading from storage.
- Cons: More complex implementation of
addneeded due to requirement for both adding to model and storage.
-
Alternative 2: Add the tutor directly to the
Storageclass as a JSON object- Pros: Less memory needed to store an extra list, especially when there would be a large number of tutors
- Cons: The
Storageclass would be handling both storing of the Tuthub file and providing of the list to the UI, which would violate OOP principles.
Find Feature
This feature filters TutHub’s filtered list of tutors based on a predicate on whether a tutor’s attribute contains the keywords being searched. User are to specify which attribute of the tutor to search for by including the prefix of the attribute when using the command.
Implementation
The find command involves the logic, model and UI components of Tuthub.
Tutor information is stored in a Tutor object, where each piece of information is an object on its own.
E.g. Name, Phone, Email. When the user wants to find a tutor, the user specifies the Prefix corresponding
to the specific attribute of the tutor followed by the keywords to be searched. Tutor objects that are matched the
keywords being searched are added to the FilteredList to be displayed in the program to the user.
The following methods in Tuthub manage the finding of tutors:
-
Tuthub#FindByNameCommand(NameContainsKeywordsPredicate predicate)- Finds and adds tutors with names matching keywords to list of tutors displayed -
Tuthub#FindByPhoneCommand(PhoneContainsKeywordsPredicate predicate)- Finds and adds tutors with phone number matching keywords to list of tutors displayed -
Tuthub#FindByEmailCommand(EmailContainsKeywordsPredicate predicate)- Finds and adds tutors with emails matching keywords to list of tutors displayed -
Tuthub#FindByModuleCommand(ModuleContainsKeywordsPredicate predicate)- Finds and adds tutors with modules matching keywords to list of tutors displayed -
Tuthub#FindByYearCommand(YearContainsKeywordsPredicate predicate)- Finds and adds tutors with year matching keywords to list of tutors displayed -
Tuthub#FindByStudentIdCommand(StudenIdContainsKeywordsPredicate predicate)- Finds and adds tutors with student ids matching keywords to list of tutors displayed -
Tuthub#FindByTeachingNominationCommand(TeachingNominationContainsKeywordsPredicate predicate)- Finds and adds tutors with teaching nominations matching keywords to list of tutors displayed -
Tuthub#FindByRatingCommand(RatingContainsKeywordsPredicate predicate)- Finds and adds tutors with rating matching keywords to list of tutors displayed -
Tuthub#FindByTagCommand(TagContainsKeywordsPredicate predicate)- Finds and adds tutors with tags matching keywords to list of tutors displayed -
Tuthub#FindByPrefixParser(String args)- Parses thefindcommand and determines theprefixcorresponding to the attribute to search through to find matching tutors -
ModelManager#filteredTutors- Ajavafx.collections.transformation.FilteredListthat contains a list of filtered tutors according to a predicate -
ModelManager#getSortedFilteredTutorList()- Returns thesortedFilteredTutorslist -
ModelManager#updateFilteredTutorList(Predicate<Tutor> predicate)- Updates filtered list based on predicate
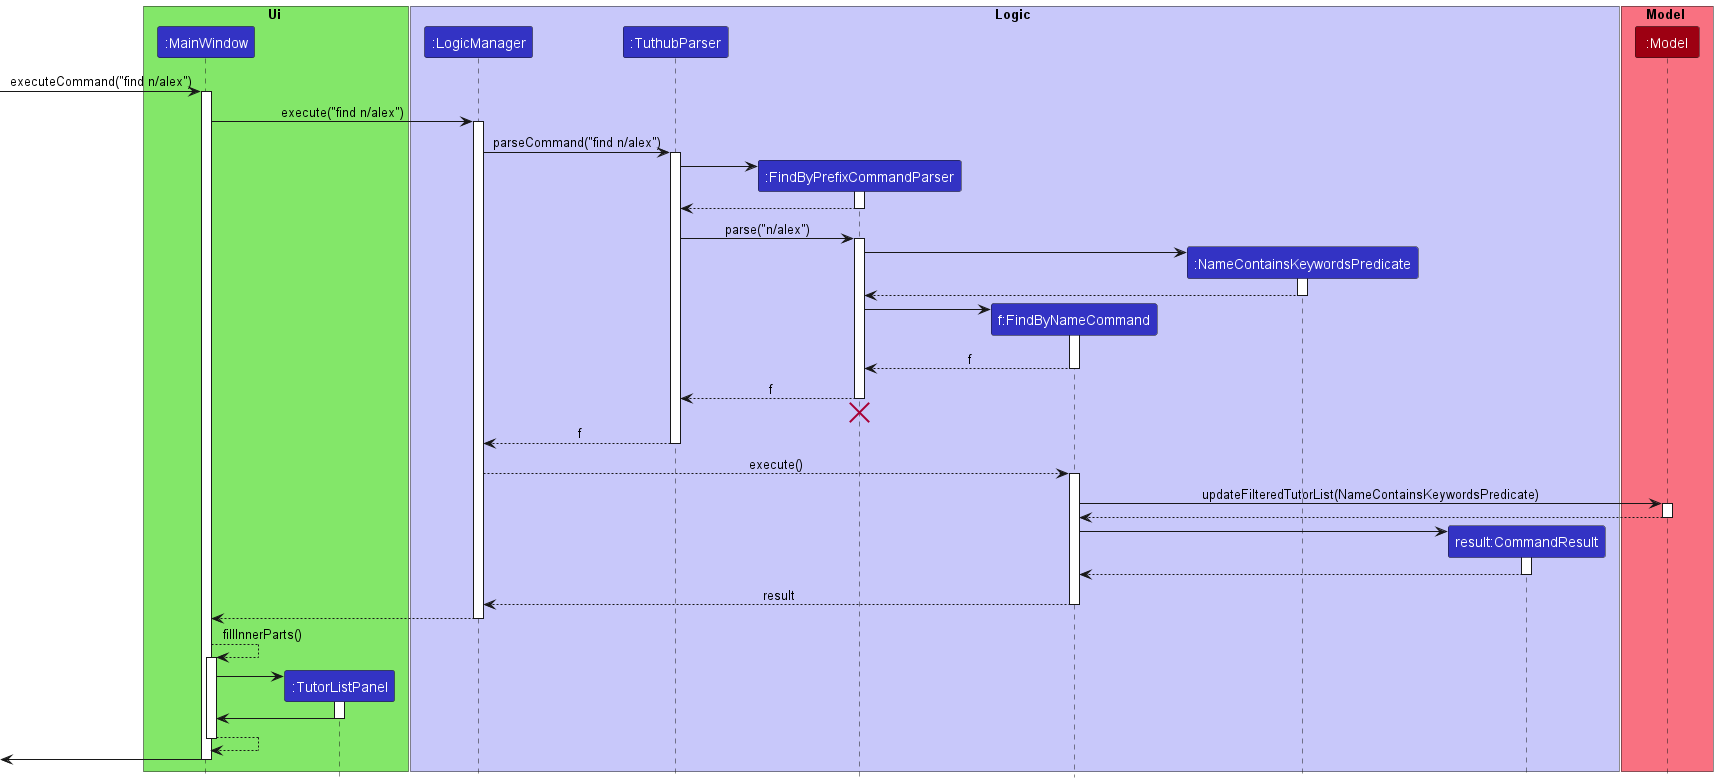
Given below is an example usage scenario when the user is finding tutors whose names contain “alex”.
Step 1: The user enter the command find n/alex.
Step 2: TutHub uses TuthubParser to determine which parser to use based on the command input by the user. In this case, FindByPrefixParser is used to parse the find command.
Step 3: FindByPrefixCommandParser parses the find command to determine the attribute to search through and the keywords input by the user.
FindByPrefixCommandParser creates a FindByNameCommand that extends FindByPrefixCommand with the keywords put into a NameContainsKeywordsPredicate object.
Step 4: The FindByNameCommand is executed and tutors with names containing the string “alex” are added to the filtered list of tutors that have names
containing the string alex captured in the ModelManager object, which makes use of the UI class to display the matching tutors.
Step 5: The execution ends, returning a CommandResult object that has the success message to be displayed to the user.
The following sequence diagram demonstrates the above operations (excluding the parsing details):
Design Considerations
Aspect: Implementation of find
-
Alternative 1:
findcommand integrates the use of prefixes in user input to determine which tutor attribute to search through. (i.e.find n/alex,find s/A0123456X) (chosen).- Pros: Better OOP practice as the resultant find commands are all subclasses of
FindByPrefixCommand - Cons: Took more time to think of and implement.
- Pros: Better OOP practice as the resultant find commands are all subclasses of
-
Alternative 2: Individual attributes of the tutor have their own find command (E.g.
findByName,findByEmail)- Pros: Easier to implement individual commands for each attribute.
- Cons: Poor OOP practice the individual commands are all
findcommands and should not be a different class on its own. User also have more commands to remember.
View Feature
The view command involves operations within the UI and communication with Logic and Model to display/hide the tutor details panel.
Implementation
The communication between the logic and UI classes is facilitated by the CommandResult class, where the following field has been added:
-
CommandResult#isView- Indicates if the current command is aviewcommand.
Given below is an example usage scenario when the user enters a view command in the command box and how the view mechanism behaves at each step.
Step 1: The user enters the command view 1.
Step 2: The TuthubParser verifies the ViewCommand#COMMAND_WORD, and requests ViewCommandParser to parse. The ViewCommandParser verifies the appropriateness of the user input (index).
Step 3: Upon parsing, a new ViewCommand is created based on the valid index.
Step 4: When the ViewCommand is executed, a new CommandResult of type isView is created and ModelManager#tutorToView is updated with the selected tutor. The following sequence diagram demonstrates the main operations carried out between Logic and Model (with UI details omitted):

Step 5: Upon recognising the CommandResult is of isView type, MainWindow calls logic#getTutorToView() to get the tutor to be displayed from Model, which is then passed into MainWindow#handleView(Tutor tutor).
Step 6: This causes the TutorDetailsPanel of the tutor to be set as visible, resulting in the side panel being displayed. The following sequence diagram demonstrates the detailed operations carried out between UI, Logic and Model:

Design Considerations
Aspect: Method to pass a Tutor to UI
-
Alternative 1: Store the tutor to be viewed as a field in
Model(chosen).- Pros: Better OOP practice since
Modelhandles all the data related to tutors. - Cons: Harder to implement as more supporting methods are required to communicate between
UIandModel.
- Pros: Better OOP practice since
-
Alternative 2: Store the tutor in
CommandResult.- Pros: Easier to implement and fewer methods may be needed in
LogicandModelas the tutor can be passed to theMainWindowdirectly throughCommandResult. - Cons: Poor OOP practice as it does not make sense for
CommandResultto store aTutor, and other commands do not require aTutorobject to be stored.
- Pros: Easier to implement and fewer methods may be needed in
Edit Feature
This command allows users to edit a specific tutor (by INDEX) in Tuthub’s displayed list.
Implementation
Similar to add command, the edit command involves the logic and model components of Tuthub, where the Model class handles the checking of uniqueness.
The following methods in particular facilitate the editing of tutors:
-
EditCommand#createEditedTutor(Tutor tutor, EditTutorDescriptor descriptor)- Creates a newTutorobject with updated fields to replace the existing one. -
Model#setTutor(Tutor target, Tutor editedTutor)- Replaces the currenttargettutor with the neweditedTutor
Given below is an example usage scenario when the user edits a tutor.
Step 1: The user enters the command word edit, followed by an index and the prefixes and corresponding descriptions that they want to change. Example: edit 1 n/John Doe.
Step 2: The TuthubParser verifies the EditCommand#COMMAND_WORD, and requests EditCommandParser to parse.
Step 3: The EditCommandParser makes sense of the arguments through the use of the prefixes, with the help of ParserUtil, and creates an EditCommand object with the target index and the provided information stored in an editTutorDescriptor object.
Step 4: When the EditCommand is executed, EditCommand#createEditedTutor(Tutor tutor, EditTutorDescriptor descriptor) creates a new Tutor object with the updated field.
Step 5: The new Tutor is then passed into Model#setTutor(Tutor target, Tutor editedTutor), which replaces the original target tutor with the editedTutor in the UniqueTutorList in Tuthub after checking for duplicates.
Step 5: The execution ends and returns a CommandResult object contained the success message to be displayed to the GUI to the user.
The following sequence diagram demonstrates the above operations (excluding details of how the current tutor was obtained from Model):

Sort Feature
This command sorts Tuthub’s displayed list based on quantitative measures, such as teaching nominations and ratings. Users are allowed to choose to sort in ascending or descending order.
Implementation
The sort command involves the logic, model, and UI part of Tuthub. Most updates are made within the ModelManager, which are:
-
ModelManager#sortedFilteredTutors- Ajavafx.collections.transformation.SortedListthat containsModelManager#filteredTutors. -
ModelManager#getSortedFilteredTutorList()- Now returns thesortedFilteredTutorslist. -
ModelManager#updateSortedTutorList(Comparator<Tutor>)- Similar toModelManager#updateFilteredTutorList, but updates the Comparator instead of predicate.
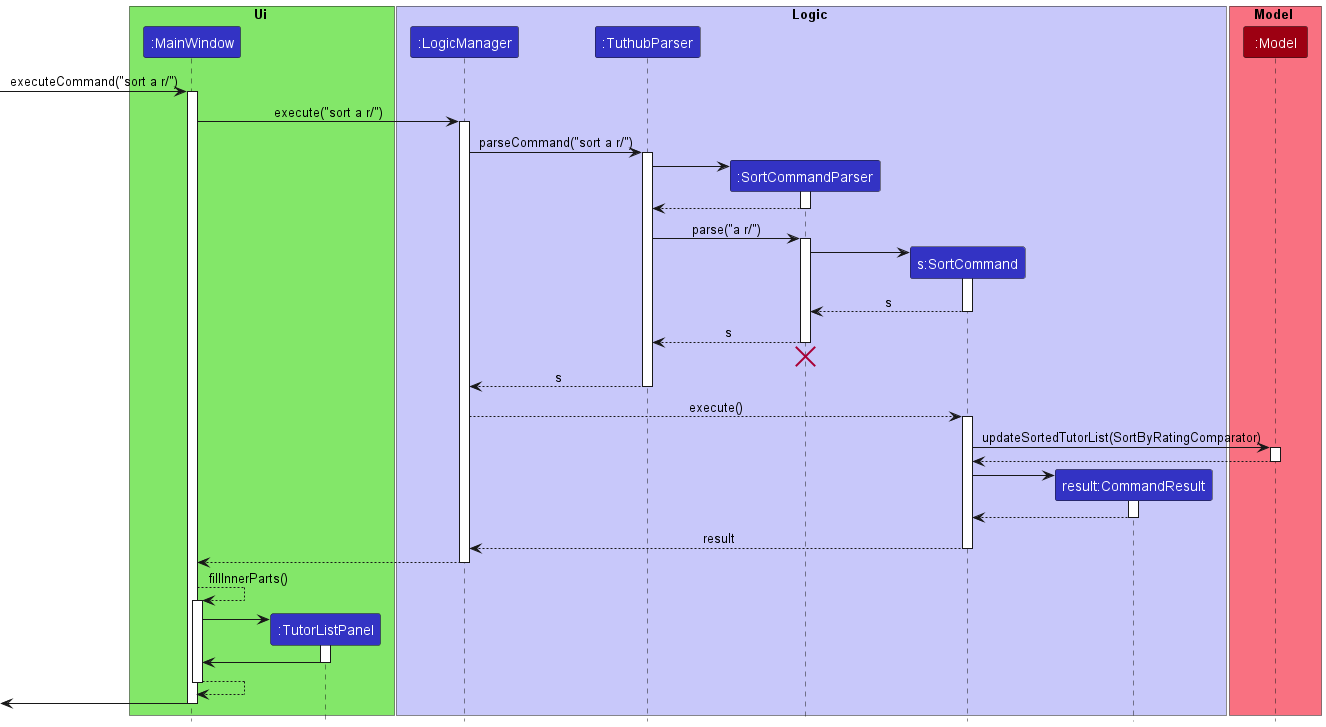
Given below is an example usage scenario when the user enters a sort command in the command box and how the sort mechanism behaves at each step.
Step 1: The user enters the command sort a r/.
Step 2: The TuthubParser verifies the SortCommand#COMMAND_WORD, and requests SortCommandParser to parse. The SortCommandParser verifies the appropriateness of the user input (order and prefix) and creates the proper Comparator based on the user request.
Step 3: Upon parsing, a new SortCommand is created based on the order, prefix, and comparator.
Step 4: In the SortCommand execution, the model#updateSortedTutorList(Comparator<Tutor>) is called upon with the proper Comparator. Then, a new CommandResult is created and stored in LogicManager.
Step 5: Upon recognising the CommandResult, MainWindow calls logic#getFilteredTutorList() to get the tutor cards to be displayed, which is passed as a constructor variable into TutorListPanel.
Step 6: Then, the TutorListPanel sets the items to view as the new and updated sortedFilteredTutors list.
The following sequence diagram demonstrates the above operations:
Design Considerations
Aspect: The scope of sort (should it be able to sort filtered tutors or not?)
-
Alternative 1: Able to sort any
FilteredList(i.e. the original tutor list or a tutor list after executing afindcommand) (chosen).- Pros: The
sortfeature achieves its primary purpose while also having a defensive implementation, as it does not directly access and affectTuthub#UniqueTutorList - Cons: Took more time to think of and implement.
- Pros: The
-
Alternative 2:
sortredefines the originalTuthub#UniqueTutorList.- Pros: Easier to implement.
- Cons: Feature becomes limited and lacking of purpose. Direct changes to original
Tuthub#UniqueTutorListis less defensive.
Aspect: Keeping track of sorting and filtering of the tutor list
-
Alternative 1: Store the
FilteredListin theSortedList(chosen).- Pros: Better OOP practice since the
FilteredListandSortedListvariables can be keptfinal. - Cons: Implementation is easy, but may be confusing to understand why and how it works.
- Pros: Better OOP practice since the
-
Alternative 2: Store two lists, one for
FilteredListand one forSortedList.- Pros: Idea is more simply understood. Serves the main purpose of
sortif implemented correctly. - Cons: Complicated to implement and possibility of many bugs. Poor OOP practice as it may require reassigning of the
FilteredListandSortedListvariables.
- Pros: Idea is more simply understood. Serves the main purpose of
Mail Feature
This command allows users to easily contact tutors from Tuthub’s displayed list. Users can mail a specific tutor (by INDEX) or all the currently displayed tutors.
Implementation
The mail command involves the logic and model part of Tuthub. Other than that, it relies on the Java classes, java.awt.Desktop and java.net.URI.
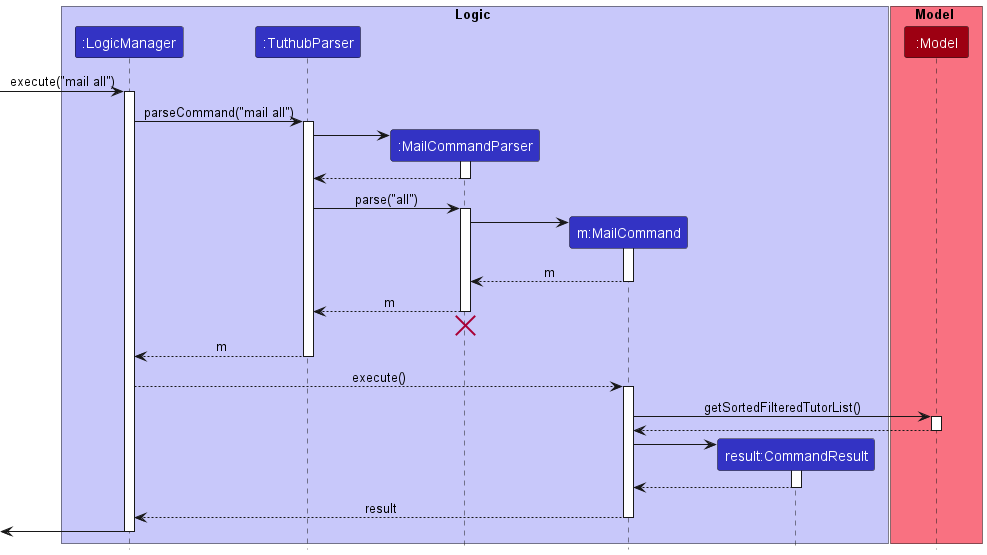
Given below is an example usage scenario when the user enters a mail command in the command box.
Step 1: The user enters the command mail all.
Step 2: The TuthubParser verifies the MailCommand#COMMAND_WORD, and requests MailCommandParser to parse. The MailCommandParser verifies the appropriateness of the user input (in this case, the valid inputs are INDEX or “all”).
Step 3: Upon parsing, a new MailCommand is created based on the target, which is all.
Step 4: In the MailCommand execution, the URI message is created by getting the emails (Tutor#getEmail()) of each tutor in the currently displayed list. The emails are combined in the message variable, which is then used as an argument in URI#create(String).
Step 5: The user’s default mail client is accessed by calling Desktop#mail(URI) with the recently created uri as the argument. Then, a new CommandResult is created and stored in LogicManager.
Step 6: Upon recognising the CommandResult, MainWindow displays the resulting CommandResult.
The following sequence diagram demonstrates the above operations (excluding java.awt.Desktop, java.net.URI, and obtaining Tutor email data):
Comment Feature
This command adds a comment to a tutor in Tuthub’s displayed list.
Implementation
The comment command involves the logic and model part of Tuthub.
This involves the updating of the CommentList of the tutor via:
-
CommentList#addComment(Comment comment)- Adds theCommentto theCommentList
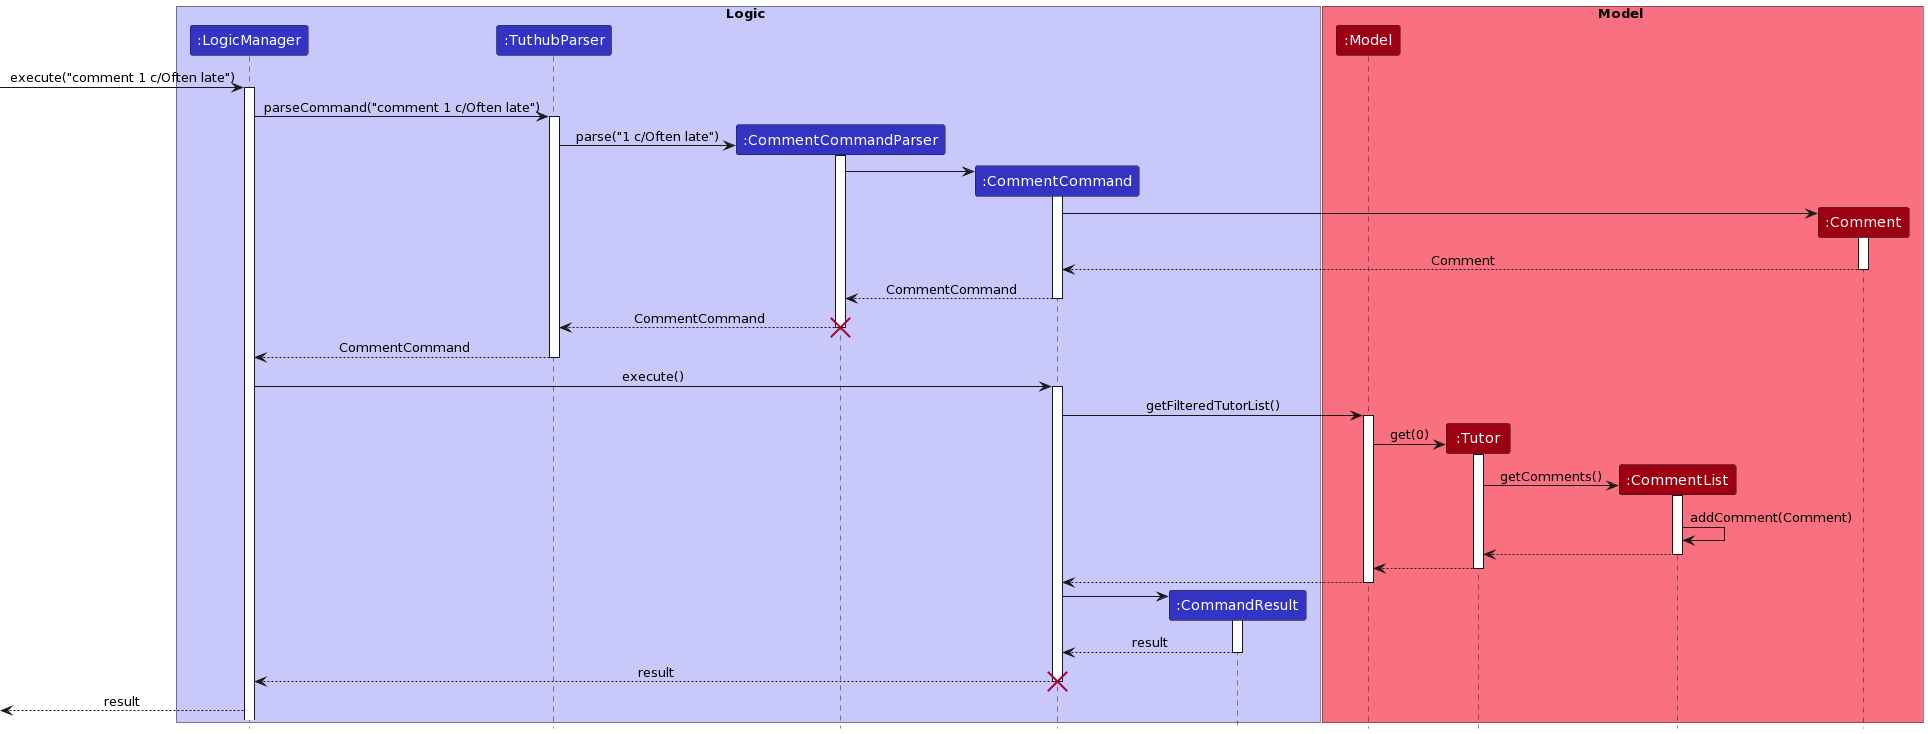
Given below is an example usage scenario when the user enters a comment command in the command box and how the comment is added to the tutor.
Step 1: The user enters the command comment 1 c/Often late.
Step 2: The TuthubParser verifies the CommentCommand#COMMAND_WORD, and requests CommentCommandParser to parse.
The CommentCommandParser verifies the appropriateness of the user input (index and comment).
Step 3: Upon parsing, a new CommentCommand is created based on the index and the comment.
A new Comment is created based on the comment parsed.
Step 4: In the CommentCommand execution, the ModelManager#getSortedFilteredTutorList() is called upon to retrieve the list of displayed tutors.
The Tutor whose index matches the index is then stored (after accounting for 0 based indexing).
In this case, the first Tutor is selected.
Step 5: For this Tutor, the tutor#getComments is called upon to retrieve the CommentList of the Tutor.
Step 6: The Comment stored in the CommentCommand is then added to the CommentList through CommentList#addComment.
Design Considerations
Aspect: How are the comments stored?
-
Alternative 1: Store the comments as a list of comments, appending the comments to the list as needed. (chosen)
- Pros: It is easier to add a
commentand remove them from each tutor. - Cons: Took more time to think of and implement.
- Pros: It is easier to add a
-
Alternative 2: Store the
commentas a string, replacing it everytime a new comment is added to the tutor.- Pros: Easier to implement.
- Cons: It is harder to add and remove comments from each tutor, as the previous comments need to be copied and then added manually by the user.
Delete Comment Feature
This command deletes a comment from a tutor in Tuthub’s displayed list.
Implementation
The deletecomment command involves the logic and model part of Tuthub.
This involves the updating of the CommentList of the tutor via:
-
CommentList#deleteComment(int index)- Deletes theCommentat theindexof theCommentList
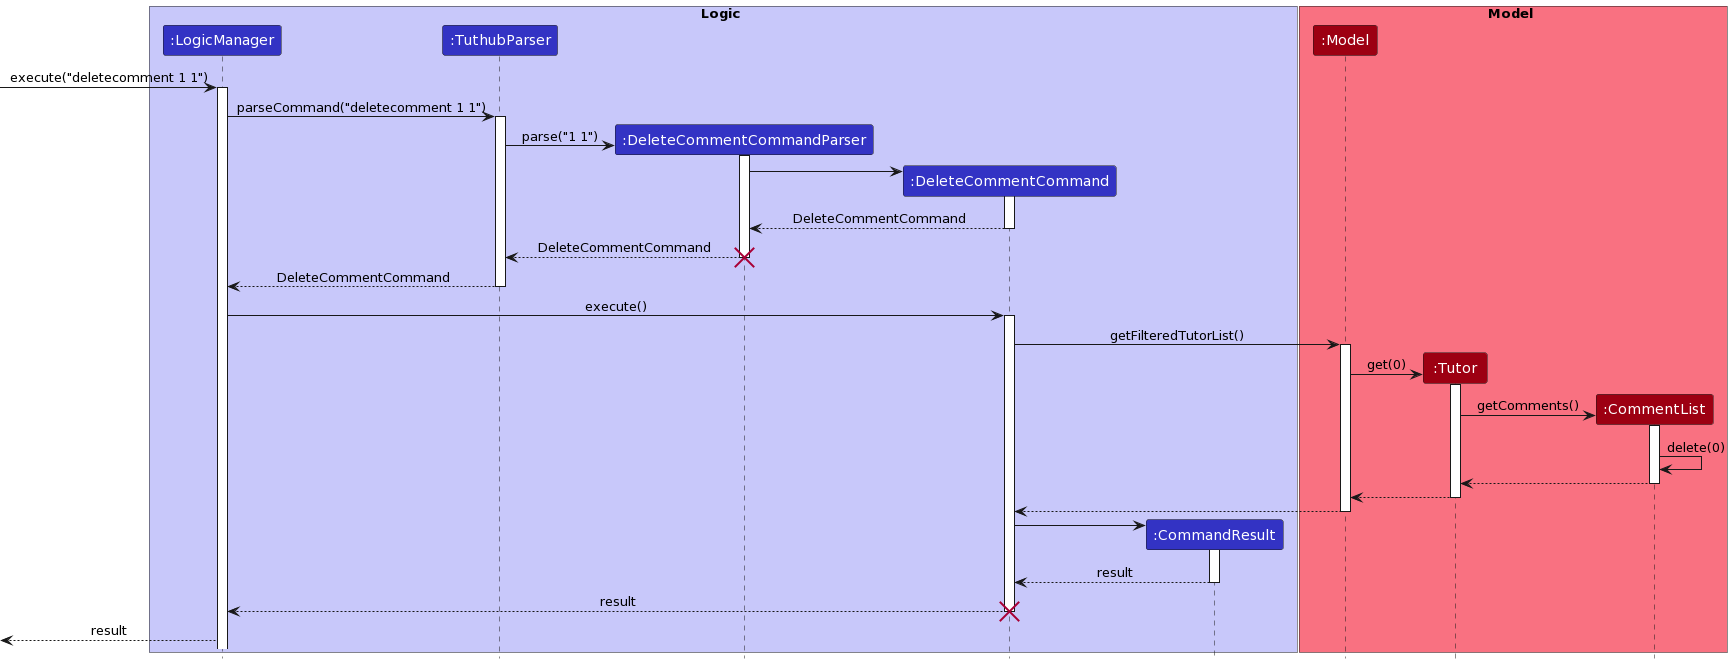
Given below is an example usage scenario when the user enters a deletecomment command in the command box and how the comment is removed from the tutor.
Step 1: The user enters the command deletecomment 1 1.
Step 2: The TuthubParser verifies the DeleteCommentCommand#COMMAND_WORD, and requests DeleteCommentCommandParser to parse.
The DeleteCommentCommandParser verifies the appropriateness of the user input (tutorIndex and commentIndex).
Step 3: Upon parsing, a new DeleteCommentCommand is created based on the tutorIndex and the commentIndex.
Both indexes are converted to 0 based indexing.
In this case, the tutorIndex and commentIndex are both set to 0.
Step 4: In the DeleteCommentCommand execution, the ModelManager#getSortedFilteredTutorList() is called upon to retrieve the list of displayed tutors.
The Tutor whose index matches the tutorIndex is then stored.
In this case, the first Tutor is selected.
Step 5: For this Tutor, the tutor#getComments is called upon to retrieve the CommentList of the Tutor.
Step 6: The CommentList retrieves the Comment that is at the index specified by commentIndex.
This Comment is then deleted from the CommentList.
In this case, the first Comment of the first Tutor is deleted.
The following sequence diagram demonstrates the above operations (excluding the parsing details):
Documentation, logging, testing, configuration, dev-ops
Appendix A: Requirements
Product scope
Target user profile:
Our target users are National University of Singapore (NUS) Professors who:
- have to manage a significant number (up to hundreds) of teaching assistant (TA) profiles
- seek a more organised and systematic way of managing profiles as compared to Excel sheets
- prefer desktop apps over other types
- can type fast
- are reasonably comfortable using CLI apps
Value proposition:
TutHub helps professors find TAs efficiently by consolidating information in an easy-to-read, easy-to-search manner by providing a systematic and visual way to categorise or sort profiles according to modules, year, performance, etc.
User stories
Priorities: High (must have) - * * *, Medium (nice to have) - * *, Low (unlikely to have) - *
| Priority | As a … | I can … | So that I can… |
|---|---|---|---|
* * * |
NUS Professor | list all tutor profiles | get a quick view of all available tutors. |
* * * |
NUS Professor | add a new tutor | track their profiles. |
* * |
NUS Professor | edit a tutor profile | update tutor information if there are any changes. |
* * * |
NUS Professor | view a tutor’s full profile | find out more about their performance and contact details to reach out for future TA roles. |
* * |
NUS Professor | comment on a tutor | keep notes about the tutor’s performance for future reference. |
* * * |
NUS Professor with many tutor profiles | find a specific tutor by various fields easily | find the most relevant and competent tutors more easily. |
* * * |
NUS Professor | sort a list of tutors according to ratings/teaching nominations | identify and pick the best tutors more easily. |
* * |
NUS Professor | mail a specific tutor or group of tutors | reach out to them for a TA role. |
* * |
NUS Professor | delete a tutor profile | remove tutors that have graduated/are no longer available to teach. |
* * * |
NUS Professor | save data | there is a local backup on the computer. |
* * * |
NUS Professor | exit the program | |
* * |
NUS Professor | clear all data | remove all irrelevant sample data on first use. |
* * |
NUS Professor new to Tuthub | view help | familiarise myself with Tuthub commands. |
Use cases
(For all use cases below, the System is Tuthub and the Actor is the NUS Professor, unless specified otherwise)
Use case: UC1 - Listing all tutor profiles
MSS
- User requests to list all tutors.
-
Tuthub shows a list of tutors.
Use case ends.
Extensions
-
2a. The list is empty.
Use case ends.
Use case: UC2 - Viewing a specific tutor profile
MSS
- User requests to list all tutors (UC1).
- User requests to view a specific tutor’s details using their displayed index on the list.
-
Tuthub displays the full details of the Tutor on a side panel and shows a success message.
Use case ends.
Extensions
- 2a. The input index is invalid.
-
2a1. Tuthub displays an error message.
Use case resumes from step 2.
-
Use case: UC3 - Adding a tutor
MSS
- User requests to add a tutor profile in the list.
-
Tuthub shows the list of tutors with the new tutor profile added.
Use case ends.
Extensions
- 1a. Tuthub detects an error in the entered data.
- 1a1. Tuthub requests for the correct data.
- 1a2. User enters new data.
-
Steps 1a1-1a2 are repeated until the data entered are correct.
Use case resumes from step 2.
Use case: UC4 - Deleting a tutor
MSS
- User requests to list tutors (UC1).
- User requests to delete a specific tutor in the list based on an index.
-
Tuthub deletes the tutor.
Use case ends.
Extensions
-
2a. The given index is invalid.
-
2a1. Tuthub shows an error message.
Use case resumes at step 2.
-
Use case: UC5 - Finding tutors
MSS
- User requests to find tutors matching keywords searched.
-
Tuthub shows a list of tutors that match the keywords searched.
Use case ends.
Extensions
- 1a. Tuthub detects an error in the entered data.
- 1a1. Tuthub requests for the correct data.
- 1a2. User enters new data.
- Steps 1a1-1a2 are repeated until the data entered are correct. Use case resumes from step 2.
-
2a. The list is empty.
Use case ends.
Use case: UC6 - Sorting the tutor list
MSS
- User requests to sort the currently displayed tutor list.
-
Tuthub sorts the list of tutors based on a prefix (
RatingorTeachingNomination) in a specific order (ascending or descending).Use case ends.
Extensions
- 1a. The given
orderis invalid.- 1a1. Tuthub displays an error message.
-
Step 1a1 is repeated until the proper
order(“a” or “d”) is entered.Use case resumes from step 1.
- 1b. The given
prefixis invalid.- 1a1. Tuthub displays an error message.
-
Step 1a1 is repeated until the proper
prefix(“r/” or “tn/”) is entered.Use case resumes from step 1.
Use case: UC7 - Editing a tutor
MSS
- User requests to view a tutor (UC2).
- User requests to edit the details of a specific tutor in the list based on index.
- Tuthub edits the details of the tutor.
-
Upon viewing the same tutor (UC2) again, the Tutor Details Panel shows the updated tutor information.
Use case ends.
Extensions
- 2a. The given index is invalid.
-
2a1. Tuthub displays an error message.
Use case resumes from step 2.
-
- 2a. The same tutor already exists in Tuthub.
-
2a1. Tuthub displays an error message.
Use case resumes from step 2.
-
- 2a. The given details are not of the right format.
-
2a1. Tuthub displays an error message.
Use case resumes from step 2.
-
Use case: UC8 - Commenting on a tutor
MSS
- User requests to view a tutor (UC2).
- User requests to comment on a specific tutor in the list based on index.
- Tuthub adds the new comment to the tutor.
-
Upon viewing the same tutor (UC2) again, the Tutor Details Panel shows the new comment added to the tutor under Additional Feedback.
Use case ends.
Extensions
- 2a. The given index is invalid.
-
2a1. Tuthub displays an error message.
Use case resumes from step 2.
-
Use case: UC9 - Deleting a comment from a tutor
MSS
- User requests to view a tutor (UC2).
- User requests to delete a comment on a specific tutor in the list based on tutor index and comment index.
- Tuthub deletes the specified comment from the tutor.
-
Upon viewing the same tutor (UC2) again, the Tutor Details Panel shows the comment removed from the tutor under Additional Feedback.
Use case ends.
Extensions
- 2a. The given tutor index is invalid.
-
2a1. Tuthub displays an error message.
Use case resumes from step 2.
-
- 2a. The given comment index is invalid.
-
2a1. Tuthub displays an error message.
Use case resumes from step 2.
-
- 2a. Only one index was provided.
-
2a1. Tuthub displays an error message.
Use case resumes from step 2.
-
Use case: UC10 - Contacting tutors by email
MSS
- User requests to find tutor(s) based on a prefix (UC5) .
- User requests to mail a single tutor or all tutors.
-
Tuthub opens the user’s default mail client with the “to” specified.
Use case ends.
Extensions
- 1a. The given input is invalid.
- 1a1. Tuthub displays an error message.
-
Step 1a1 is repeated until the proper input (a valid index or “all”) is entered.
Use case resumes from step 1.
- 2a. The user’s default mail client is not found or fails to be launched.
- 2a1. Tuthub displays an error message.
-
Step 2a1 is repeated until the user’s default mail client can be accessed.
Use case resumes from step 2.
Use case: UC11 - Viewing help
MSS
- User requests to view help.
-
Tuthub displays the Help Window.
Use case ends.
Use case: UC12 - Exit the program
MSS
- User requests to exit Tuthub.
-
Tuthub saves list of tutor profiles in hard disk.
Use case ends.
Non-Functional Requirements
- Should work on any mainstream OS as long as it has Java
11or above installed. - Should be able to hold up to 1000 tutors without a noticeable sluggishness in performance for typical usage.
- A user with above average typing speed for regular English text (i.e. not code, not system admin commands) should be able to accomplish most of the tasks faster using commands than using the mouse.
- The system should respond within a second.
- The data should be stored locally and should be in a human editable text file.
Glossary
- Mainstream OS: Windows, Linux, Unix, OS-X
- Student Feedback Points/Ratings: A way the National University of Singapore (NUS) assess tutors and professors’ performances by gathering feedback from students.
- Teaching Assistant (TA): A part-time tutor who supports professors in teaching a module by conducting tutorial/lab sessions.
- Teaching Nominations: Number of nominations submitted by students for a teaching excellence award in NUS.
-
Tutor Profile: A profile containing the tutor’s details, such as
NAME,PHONE_NUMBER,EMAIL, etc.
Appendix B: Instructions for manual testing
Given below are instructions to test the app manually.
Launch and shutdown
-
Initial launch
-
Download the jar file and copy into an empty folder
-
Double-click the jar file
Expected: Shows the GUI with a set of sample contacts. The window size may not be optimum.
-
-
Saving window preferences
-
Resize the window to an optimum size. Move the window to a different location. Close the window.
-
Re-launch the app by double-clicking the jar file.
Expected: The most recent window size and location is retained.
-
Viewing a tutor’s full details
-
Viewing a tutor’s full details
-
Prerequisites: List all tutors using the
listcommand. Multiple tutors in the list. -
Test case:
view 1
Expected: Details panel of the first tutor in the list is displayed. Details of the tutor viewed shown in the status message. -
Test case: Click on the first tutor card in the list with mouse.
Expected: Details panel of the first tutor in the list is displayed. Details of the tutor viewed shown in the status message. -
Test case:
view 0
Expected: No tutor panel displayed. Error details shown in the status message. -
Other incorrect view commands to try:
view,view x(wherexis larger than the list size)
Expected: Similar to previous.
-
Finding a tutor
-
Finding a tutor based on a specified attribute
-
Prerequisites: List all tutors using the
listcommand. Multiple tutors in the list. -
Test case:
find n/alex
Expected: List of tutors with name containing the stringalexis shown. Status message shows how many tutors were found. -
Test case:
find n/
Expected: Error status messages telling user what kind of input is valid forn/prefix. -
Other incorrect commands to try:
find n/Expected: Similar to previous.
-
Deleting a tutor
-
Deleting a tutor while all tutors are being shown
-
Prerequisites: List all tutors using the
listcommand. Multiple tutors in the list. -
Test case:
delete 1
Expected: First contact is deleted from the list. Details of the deleted contact shown in the status message. Timestamp in the status bar is updated. -
Test case:
delete 0
Expected: No tutor is deleted. Error details shown in the status message. Status bar remains the same. -
Other incorrect delete commands to try:
delete,delete x,...(wherexis larger than the list size)
Expected: Similar to previous.
-
Sorting the tutor list
-
Sorting the tutor list while all tutors are being shown
-
Prerequisites: List all tutors using the
listcommand. Multiple tutors in the list. -
Test case:
sort a r/
Expected: The tutor list should be sorted by rating in ascending order (low to high). This can be seen by viewing tutor profiles. -
Test case:
sort d tn/
Expected: The tutor list should be sorted by teaching nominations in descending order (high to low). This can be seen by viewing tutor profiles. -
Test case:
sort m r/
Expected: No sorting occurs. Error details shown in the status message (orderis invalid). -
Test case:
sort a n/
Expected: No sorting occurs. Error details shown in the status message (prefixis invalid). -
Test case:
sort a
Expected: No sorting occurs. Error details shown in the status message (Wrong command format). -
Other incorrect sort commands to try:
sort,sort x p,...(wherexis any character other thanaandd, andp/is any prefix other thanr/andtn/)
Expected: Similar to 4 and 5.
-
-
Sorting the tutor list after a filter (
find)-
Prerequisites: Filter the tutor list by executing a
findcommand. -
Test case:
sort a r/
Expected: The currently displayed tutor list should be sorted by rating in ascending order (low to high). This can be seen by viewing tutor profiles. -
Test case:
sort d tn/
Expected: The currently displayed tutor list should be sorted by teaching nominations in descending order (high to low). This can be seen by viewing tutor profiles. -
Incorrect sort commands from first case. Expected: Same expected results as the first case.
-
Adding comments
-
Adding a comment to a tutor while all tutors are being shown
-
Prerequisites: List all tutors using the
listcommand. At least one tutor in the list. -
Test case:
comment 1 c/Test comment
Expected: “Test comment” should be added to the first tutor. This can be seen by viewing the first tutor profile. -
Test case:
comment 1 Test comment
Expected: No comment is added. Error details shown in status message (Wrong command format). -
Test case:
comment 1
Expected: No comment is added. Error details shown in status message (Empty comment). -
Other incorrect comment commands to try:
comment,comment x p/Test comment 1,...(wherexis any number greater than the size of the tutor list, andp/is any prefix other thanc/)
Expected: Similar to 3.
-
Deleting comments
-
Deleting a comment from a tutor while all tutors are being shown
-
Prerequisites: List all tutors using the
listcommand. At least one tutor in the list. At least one comment for said tutor. -
Test case:
deletecomment 1 1
Expected: First comment deleted from first tutor in the list. This can be seen by viewing the first tutor profile. -
Test case:
deletecomment 1
Expected: No comment is deleted. Error details shown in status message (Wrong command format). -
Test case:
deletecomment 1 0
Expected: No comment is added. Error details shown in status message (Index out of range). -
Other incorrect comment commands to try:
deletecomment,deletecomment x y,...(wherexis any number greater than the tutor list andyis any number greater than the comment list of the tutor)
Expected: Similar to 3.
-
Mailing tutor(s)
-
Mailing the tutor list while all tutors are being shown
-
Prerequisites: List all tutors using the
listcommand. Multiple tutors in the list. -
Test case:
mail 1
Expected: The user’s default mail client should be launched with the “to” specified as the first tutor’s email. -
Test case:
mail all
Expected: The user’s default mail client should be launched with the “to” specified as the all tutor emails in this list. -
Test case:
mail 0
Expected: User’s default mail client not displayed. Error details shown in the status message. -
Test case:
mail a
Expected: User’s default mail client not displayed. Error details shown in the status message. -
Other incorrect mail commands to try:
mail,mail x,mail c(wherexis larger than the current list size, andcis any word excludingall)
Expected: Similar to 4 and 5.
-
Saving data
- Dealing with missing/corrupted data files
-
Prerequisites: If you have used Tuthub before, there should be a
tuthub.jsonin the./data/directory. If not, the directory and file will be created when you first launch Tuthub. -
Test Case: Before starting Tuthub, enter random characters in the
tuthub.jsonfile. Launch Tuthub.
Expected: Tuthub should start with no tutors in the list. You should see a warning message “WARNING: Data file not in the correct format. Will be starting with an empty Tuthub” in the terminal console. -
Test Case: Before starting Tuthub, delete
tuthub.json. Launch Tuthub.
Expected: Tuthub will start with a sample list of tutors. A newtuthub.jsonfile containing the sample data will be created. -
Test Case: While Tuthub is running, delete
tuthub.json. Try carrying out a valid command, e.g.view 1.
Expected: Command works as per usual. Upon carrying out the command, a newtuthub.jsonfile will be created.
-